5. Containerization
5.1. What is containerization?
Until recently when people were talking about virtualization, one would think of VirtualBox and full GUI accessible virtual machines (VM), e.g. running a Ubuntu Linux VM on a Windows host machine. However, containerization takes this concept to another level. Generally, containerization in enterprise environments is used for micro-service virtualization, that is, to ship a specific application as a self-contained unit, including operating system.
Containers are useful to ensure application and environment compatibility on different computing resources. If you distribute applications or software through a container, whoever uses this container does not have to deal with installing missing dependencies and the like. The container contains all of it, while still being manageable in size.
The most famous container engine is Docker. It is designed primarily for network micro-service virtualization and facilitates creating, maintaining and distributing container images that are relatively easy to install, well documented, and standardized. Docker containers are also kind of reproducible.
So why not use Docker? Using Docker on your local resources is great but unfortunately Docker containers are not designed for the use with traditional high performance computing.
Singularity to the rescue. Singularity is a containers engine developed at the Berkeley Lab and designed for the needs of scientific workloads [KURTZER2017a]. Some points of note with regards to Singularity:
- Containers are stored in a single file.
- No system, architectural or workflow changes are necessary to integrate on HPC systems.
- Limits user’s privileges (inside user = outside user).
- Unlike Docker, there is no need for a root owned container daemon.
- However, Singularity is able to run Docker images.
- Simple integration with resource managers, InfiniBand, GPUs, MPI, file systems, and supports multiple architectures.
- Security: When a container is launched by a user all programs inside the container run as that user. If you want to be root inside the container, you must first be root outside of the container
5.2. What does it accomplish for us?
Once you have installed Singularity, you can use container images with pre-configured operating systems and software installed. In our case of course software for analysing genomic data. You can build “relatively” easy your own container (see an example below “Building your own Singularity container locally”) but you can also use preconfigured containers at will, e.g. from Biocontainers. In this way we can achieve another layer of reproducibility as we can package the tools we use in a container, that can be run like it is on different host systems.
5.3. Using a Singularity container
First, we need to have Singularity installed on our system where we want to run the container (see installation instructions here). Second, we need a container. Lets download a ready-made container containing BWA from the Biocontainers registry to see how this works:
$ singularity pull docker://biocontainers/bwa
Next, we can use BWA from within the container on files located on our host system, e.g.
$ singularity exec bwa.simg bwa mem -t 8 genomeindex sample.fastq > sample.sam
In this way BWA is compartmentalised and if someone else would use the same container, the version of BWA, as well as the underlying operating system that executes BWA, would be the same as in our analysis.
Note
Containers can of course change and be overwritten, however, in practise one could freeze a container that was used for an analysis so that it can be re-used like in the original study.
We will integrate a container into our Snakemake workflow below, first however, we are going to see how to build our own container.
5.4. Building your own Singularity container locally
I am going to build a Singularity container that contains the same tools and versions that we used in the last section to analyse our data.
Line 1 and 2 define the base container, here a docker container containing a Miniconda3 installation.
In the %environment part, starting on line 7, we define some environment variables within the container, so that the conda command is exposed and ready to use within the container.
Finally, in the %post section, we add conda channels to make Bioconda tools available to the container and finally install the same software and versions we used before.
We clean out any remaining downloaded packages on line 25
1 2 3 4 5 6 7 8 9 10 11 12 13 14 15 16 17 18 19 20 21 22 23 24 25 | Bootstrap: docker
From: continuumio/miniconda3:4.4.10
%labels
AUTHOR [email protected]
%environment
# ~~~~~~~~~~~~~~~~~~~~~~~~~~~~~~~~~~~~~~~~~~~~~~~~~~~~~~~~~~~~~~~~~~~~~~~~~~~~~
# This sets global environment variables for anything run within the container
export PATH="/opt/conda/bin:/usr/local/bin:/usr/bin:/bin:"
unset CONDA_DEFAULT_ENV
export ANACONDA_HOME=/opt/conda
%post
# ~~~~~~~~~~~~~~~~~~~~~~~~~~~~~~~~~~~~~~~~~~~~~~~~~~~~~~~~~~~~~~~~~~~~~~~~~~~~~
# This is going to be executed after the base container has been downloaded
export PATH=/opt/conda/bin:$PATH
conda config --add channels defaults
conda config --add channels conda-forge
conda config --add channels bioconda
conda install --yes bwa=0.7.15
conda install --yes sickle-trim=1.33
conda install --yes subread=1.6.1
conda install --yes samtools=1.8
conda clean --index-cache --tarballs --packages --yes
|
If we have Singularity installed locally on our machine, we can build the container named biotools.simg with the following command:
$ sudo singularity build biotools.simg Singularity
As can be seen in the command above, to build a new Singularity container, we need root privileges (hence sudo) on the machine we want to build the container on.
Sometimes, however, this is not possible, e.g. on shared resources, like on cluster environments we do not normally have root privileges.
This brings us to the next section “Building a container on Singularity Hub”.
5.5. Building a container on Singularity Hub
There is another method that we can use to integrate our container into our workflow.
Instead of building the container locally, we can automatically build the container in the “cloud” on Singularity Hub.
In order to do this, we need to create a Git repository (here sschmeier/biotools at https://github.com/sschmeier/biotools) and add the Singularity file to the repository and push the repository to GitHub.
$ git init
$ git add Singularity
$ git commit -m "Init."
$ git remote add origin [email protected]:sschmeier/biotools.git
$ git push -u origin master
Next, we need to create an account (for free) on Singularity Hub and connect our GitHub repository.
Now, with every push of a changed Singularity file in our Git repository to GitHub, Singularity Hub will detect that a change occurred and (re)build the container for us (see Fig. 5.2).
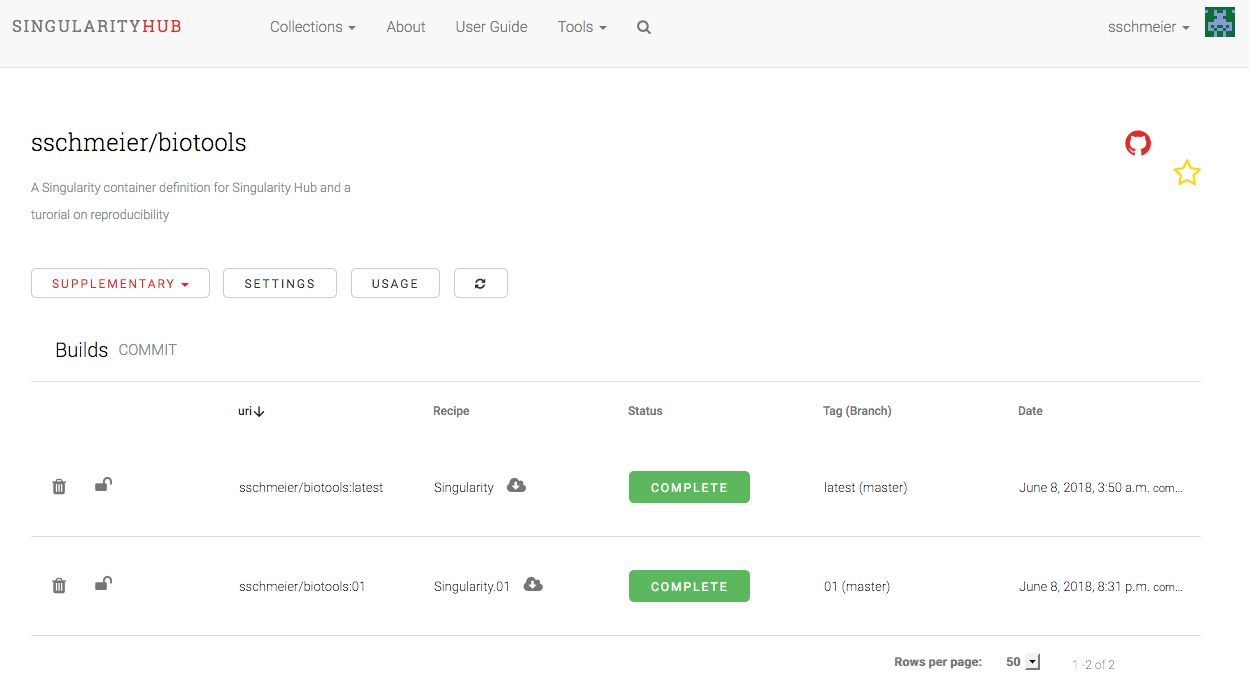
Fig. 5.2 A screen shot form the Singularity Hub website.
Once, the container has been build and stored on Singularity Hub, it is readily available for us and others to be downloaded and used on a system that has Singularity installed, i.e. a Linux-based system.
$ singularity pull --name "biotools.simg" shub://sschmeier/biotools:latest
$ singularity exec biotools.simg samtools --version
samtools 1.8
Using htslib 1.8
Copyright (C) 2018 Genome Research Ltd.
Note
We can have different versions of our Singularity file, e.g. Singularity.01, or Singularity.mickeymouse, etc. Singularity Hub will build one container for each Singularity file. These can be later specifically “pulled” from the Hub. The original Singularity file will be automatically tagged as latest, hence shub://sschmeier/biotools:latest in the above shell command, in which “latest” could be ignored.
5.6. Using a container in our workflow
We need Singularity installed on the system we are going to use the container, however, we do not need a privileged user to merely run Singularity.
We will change a rule in our Snakefile file, so that instead of using the local conda environment, Snakemake is going to pull our Singularity container from Singularity Hub and uses it to run the trimming step.
The container is stored locally in your current working directory within the .snakemake directory, so that it does not have to be pulled again as long as it did not change.
In the example below only the yellow part changed from the conda version to the Singularity container version.
1 2 3 4 5 6 7 8 9 10 11 12 13 14 15 16 17 18 | rule trimse:
input:
"fastq/{sample}.fastq.gz"
output:
"analyses/results/{sample}.trimmed.fastq.gz"
log:
"analyses/logs/{sample}.trimse"
benchmark:
"analyses/benchmarks/{sample}.trimse"
conda:
"envs/sickle.yaml"
singularity:
"shub://sschmeier/biotools:latest"
params:
qualtype="sanger"
shell:
"sickle se -g -t {params.qualtype} -f {input} -o {output}"
" 2> {log}"
|
Execute the workflow from the command-line with:
$ snakemake -p --use-singularity
Even though the conda directive is still present int he rule, it will not be used without invocation through the Snakemake flag --use-conda.
Note
By using both flags --use-singularity and --use-conda we can even mix the execution, some rules that define a container will be run with the container, while others that still are defining a conda environment will be run with the local conda environment. However, in practice this is not done most of the times (see below).
Attention
Singularity by default only has access to the folders under your home directory. To be able to use files that are located somewhere else in you system, you need to supply singularity explicitly with that location. This can be facilitated in Snakemake by adding the following argument: --singularity-args "--bind /folder/to/allow/access".
5.7. Using one container for the whole workflow
Instead of defining one container per rule, we could also define one container for the whole Snakefile and in this way have all rules run with the specified container:
1 2 3 4 5 6 7 8 9 10 11 12 13 14 15 16 17 18 19 | singularity: "shub://sschmeier/biotools:latest"
rule trimse:
input:
"fastq/{sample}.fastq.gz"
output:
"analyses/results/{sample}.trimmed.fastq.gz"
log:
"analyses/logs/{sample}.trimse"
benchmark:
"analyses/benchmarks/{sample}.trimse"
params:
qualtype="sanger"
shell:
"sickle se -g -t {params.qualtype} -f {input} -o {output}"
" 2> {log}"
rule map:
...
|
5.8. Ready made containers
In any case, it needs to be pointed out that we do not necessarily need to build and use our own containers. Biocontainers collects containers for lots of different purposes. However, to achieve best possible reproducibility your own containers on Singularity Hub would be preferable as one has control over freezing container states and thus making them truly reproducible. In practise one could place the URL to the container (on Singularity Hub) in the Methods part of a manuscript. In this way it would be clear what versions of tools have been used for the analyses and everyone can pull and re-use the container.
5.9. Combining containers with conda-based package management
The former section outlined how to use one container for the whole workflow. This can be combined with conda-based package management to make use of both containerization and rule-based package management. This is really powerful. We can define a global conda docker container and still use per rule yaml files for package definitions. In this way, Snakemake will first enter the container and create conda environments based on the yaml-file definitions. Upon execution of a rule, Snakemake will first enter the container and activate the environment subsequently before the rule is executed. This process gives us a bit more flexibility in terms of package management, with the added benefit of not having to create several Singularity images. An example definition is shown below:
1 2 3 4 5 6 7 8 9 10 11 12 13 14 15 16 17 18 19 20 21 | singularity: "docker://continuumio/miniconda3:4.5.11"
rule trimse:
input:
"fastq/{sample}.fastq.gz"
output:
"analyses/results/{sample}.trimmed.fastq.gz"
log:
"analyses/logs/{sample}.trimse"
benchmark:
"analyses/benchmarks/{sample}.trimse"
conda:
"envs/sickle.yaml"
params:
qualtype="sanger"
shell:
"sickle se -g -t {params.qualtype} -f {input} -o {output}"
" 2> {log}"
rule map:
...
|
5.10. Background reading on containers
- Singularity Containers for Science. Kurtzer GM. [KURTZER2017a]
- Singularity: Scientific containers for mobility of compute. [KURTZER2017b]
References
| [KURTZER2017a] | (1, 2) Kurtzer GM. Singularity Containers for Science. Presentation [PDF] |
| [KURTZER2017b] | Kurtzer GM, Sochat V, Bauer MW. Singularity: Scientific containers for mobility of compute. PLoS ONE 12(5): e0177459. https://doi.org/10.1371/journal.pone.0177459 |